Windows

  • Add Network Printer and Set as Default .vbs

     addPrinter.vbs

    On Error Resume Next
     
    Set WshNet = CreateObject("WScript.Network")
     
    WshNet.AddWindowsPrinterConnection "\\SERVERNAME\PrinterName"
    WshNet.SetDefaultPrinter "\\SERVERNAME\PrinterName"
     
    Set WshNet = Nothing
  • Browse Folder .vbs

     BrowseFolder.vbs

    Const MY_COMPUTER = &H11&
    Const WINDOW_HANDLE = 0
    Const OPTIONS = 0
     
    Set objShell = CreateObject("Shell.Application")
    Set objFolder = objShell.Namespace(MY_COMPUTER)
    Set objFolderItem = objFolder.Self
    strPath = objFolderItem.Path
     
    Set objShell = CreateObject("Shell.Application")
    Set objFolder = objShell.BrowseForFolder (WINDOW_HANDLE, "Select a folder:", OPTIONS, strPath)
         
    If objFolder Is Nothing Then
        Wscript.Quit
    End If
     
    Set objFolderItem = objFolder.Self
    objPath = objFolderItem.Path
     
    Wscript.Echo objPath
     

    Usage.bat

    @echo off
    For /F "Tokens=1 Delims=" %%I In ('cscript //nologo BrowseFolder.vbs') Do Set _FolderName=%%I
     
    .\RoboCopy\robocopy C:\TEMP %_FolderName% testfile
    pause
  • Delete Folder .vbs

    deletefolder.vbs

    Option Explicit
     
    Dim strDirectory
    Dim objFSO
     
    strDirectory = "C:\yourfolder"
     
    Set objFSO = CreateObject("Scripting.FileSystemObject")
     
    If objFSO.FolderExists(strDirectory) Then
      objFSO.DeleteFolder strDirectory, 1
    End If
  • Delete Folder Using a Variable .vbs

    deletefolder(variable).vbs

    1
    2
    3
    4
    5
    6
    7
    8
    9
    10
    11
    12
    13
    On Error Resume Next
    Dim objFSO
    Set WshShell = CreateObject("Wscript.Shell")
     
    ProgramFiles=WshShell.ExpandEnvironmentStrings("%PROGRAMFILES%")
     
    strPath=ProgramFiles & "\Vendor\Application"
     
    Set objFSO = CreateObject("Scripting.FileSystemObject")
     
    If objFSO.DeleteFolder(strPath) Then
      objFSO.DeleteFolder strPath, 1
    End If
  • Delete Shortcut .vbs

    deleteshortcut.vbs

    Option Explicit
    On Error Resume Next
    Dim objFSO, objProfileFolder, objFolder, wshShell
    Dim strDesktopPath1, strDesktopPath2, strDesktopPath3, strFilePath, strShortCut, strProfile, strProfileRoot
     
    Set wshShell = CreateObject("WScript.Shell")
    Set objFSO = CreateObject("Scripting.FileSystemObject")
     
    strShortCut = "yourshortcutname.url/lnk"
    strDesktopPath1 = wshShell.SpecialFolders("AllUsersDesktop")
    strDesktopPath2 = WshShell.ExpandEnvironmentStrings("%allusersprofile%")&"\desktop"
    strDesktopPath3 = wshShell.SpecialFolders("Desktop")
    strProfile = wshShell.ExpandEnvironmentStrings("%USERPROFILE%")
    strProfileRoot = objFSO.GetFolder(strProfile).ParentFolder.Path
     
    Set objProfileFolder = objFSO.GetFolder(strProfileRoot)
     
    For Each objFolder in objProfileFolder.SubFolders
      strFilePath = objFolder.Path & "\Desktop\" & strShortCut
    '  MsgBox "Testing to see if " & strFilePath & " exists..."
      If objFSO.FileExists(strFilePath) Then
    '    MsgBox "Shortcut exists. Deleting..."
        objFSO.DeleteFile strFilePath
      End If
    Next
     
    Set wshShell = Nothing
    Set objFSO = Nothing
    Set objProfileFolder = Nothing
    Set objFolder = Nothing
  • Install MSI (Simple) .vbs

    install-MSInospaces.vbs

    Option Explicit
     
    Dim wshShell, strCmd, oEnv
     
    Set wshShell = CreateObject("WScript.Shell")
     
    Set oEnv = wshShell.Environment("PROCESS")
    oEnv("SEE_MASK_NOZONECHECKS") = 1
     
    wshShell.Run "msiexec /i \\SERVERNAME\pathwithnospaces\yourmsi.msi /qn /norestart", 0, True
     
    oEnv.Remove("SEE_MASK_NOZONECHECKS")
    Set oEnv = Nothing
    Set wshShell = Nothing
  • Remove Registry VALUE on Install in Basic MSI


    Problem: Existing install of an MSI application will not un-install.

    On 30+ servers a vendor supplied MSI needed to be updated to the next version however the application would not un-install using any standard removal methods with various switches and will not upgrade to the next version. Using MSIZap seems to work but the subsequent install of the next version results in mis-match errors.

    Reason: Rogue property set via an MST transform on install.

    A PROPERTY was found that was set via a transform when the original application was installed ADDDEFAULT=ALL. Whichever setting this property is affecting it allowed the install but not the un-install.

    Fix: Break the link between the transform and the MSI.

    Within the HKEY_CLASSES_ROOT\Installer\Products\<GUID> registry key a VALUE exists that connects the MSI to it's transform MST file so removing this VALUE will allow the normal un-install process to complete. Creating a basic MSI to remove the VALUE was decided as the easiest option to rollout using existing deployment tools.


    Create a basic MSI with an entry in the RemoveRegistry table replacing the values with your own settings, I used '0' for the root as I needed to work with HKEY_CLASSES_ROOT but check the details below for your own values.

    *Column Name* *Row Contents*
    RemoveRegistry RemoveRegistry01
    Root 0
    Key Installer\Products\<GUID>
    Name Transforms
    Component ISRegistryValue
     
    RemoveRegistry (s72)

    Unique name to define the entry (you can choose this)

    Root (i2)

    numeric value defining the registry hive you'll be deleting from
    0 = HKCR
    1 = HKCU
    2 = HKLM
    3 = HKU

    Key (l255)

    The rest of the key name, such as SOFTWARE\MyProduct\

    Name (L255)

    Name of the Registry VALUE, such as UninstallString

    Component_ (s72)

    Name of a component from the component table to link the removal too, this has to be a component selected for install. If you don't have an existing component to use just create a new component.

  • Show Disk Usage .ps1

    get-DiskUsgae.ps1

    $dirRoot = "C:\"
     
    function get-FolderSize($path){
      $total = 0
      $files = Get-ChildItem $path -ErrorAction SilentlyContinue
      foreach ($file in $files) {
        $total += $file.length
      }
      return $total
    }
     
    $results = @()
    $dirs = get-ChildItem $dirRoot -Recurse -ErrorAction SilentlyContinue | Where-Object { $_.mode -eq 'd----' }
     
    foreach ($dir in $dirs) { 
      $childFiles = (get-ChildItem $dir.pspath -ErrorAction SilentlyContinue | Where-Object{ $_.mode -ne 'd----'})
      if (($childFiles).count) {$filecount = ($childFiles.count)}
      elseif ($childFiles)     {$filecount = 1                  }
      else                     {$filecount = 0                  }
     
      $childDirs = (get-ChildItem $dir.pspath -ErrorAction SilentlyContinue | Where-Object{ $_.mode -eq 'd----'})
      if (($childDirs).count) {$dircount = ($childDirs.count)}
      elseif ($childDirs)     {$dircount = 1                 }
      else                    {$dircount = 0                 }
         
      $result = New-Object psobject -Property @{Folder = (Split-Path $dir.pspath -NoQualifier); TotalSize = (get-FolderSize($dir.pspath)); FileCount = $filecount; SubDirs = $dircount}
      $results += $result
    }
     
    #$results | Select-Object Folder, TotalSize, FileCount, SubDirs | Sort-Object TotalSize -Descending | Format-Table -auto
    $results | Select-Object Folder, TotalSize, FileCount, SubDirs | Sort-Object TotalSize -Descending | Out-GridView -Title "get-DiskUsage"
    #Write-Host "Total of $($dirs.count) directories"
  • Show Fully Qualified Domain Name .vbs

    get-FQDN.vbs

    StrRegKeyCompName = "HKLM\SYSTEM\CurrentControlSet\Control\ComputerName\"
    StrRegKeyTCPIP = "HKLM\SYSTEM\CurrentControlSet\Services\Tcpip\Parameters\"
     
    Set WSHShell = CreateObject("WScript.Shell")
     
    StrHostname = WSHShell.RegRead (StrRegKeyTCPIP & "Hostname")
    StrDomainName = WSHShell.RegRead (StrRegKeyTCPIP & "Domain")
    StrFQDN = StrHostName & "." & StrDomainName
    msgbox StrFQDN
  • Show Installed Software .ps1

    get-InstalledSoftware.ps1

    Function get-InstalledSoftware {
      Param([String[]]$Computers)  
      If (!$Computers) {$Computers = $ENV:ComputerName} 
      $Base = New-Object PSObject; 
      $Base | Add-Member Noteproperty ComputerName -Value $Null; 
      $Base | Add-Member Noteproperty Name -Value $Null; 
      $Base | Add-Member Noteproperty Publisher -Value $Null; 
      $Base | Add-Member Noteproperty InstallDate -Value $Null; 
      $Base | Add-Member Noteproperty EstimatedSize -Value $Null; 
      $Base | Add-Member Noteproperty Version -Value $Null; 
      $Results =  New-Object System.Collections.Generic.List[System.Object]; 
     
      ForEach ($ComputerName in $Computers){ 
        $Registry = $Null; 
        Try{$Registry = [Microsoft.Win32.RegistryKey]::OpenRemoteBaseKey([Microsoft.Win32.RegistryHive]::LocalMachine,$ComputerName);} 
        Catch{Write-Host -ForegroundColor Red "$($_.Exception.Message)";} 
             
        If ($Registry){ 
          $UninstallKeys = $Null; 
          $SubKey = $Null; 
          $UninstallKeys = $Registry.OpenSubKey("Software\Microsoft\Windows\CurrentVersion\Uninstall",$False); 
          $UninstallKeys.GetSubKeyNames()|%{ 
            $SubKey = $UninstallKeys.OpenSubKey($_,$False); 
            $DisplayName = $SubKey.GetValue("DisplayName"); 
            If ($DisplayName.Length -gt 0) {
    	        $Entry = $Base | Select-Object * 
              $Entry.ComputerName = $ComputerName; 
              $Entry.Name = $DisplayName.Trim();  
              $Entry.Publisher = $SubKey.GetValue("Publisher");  
              [ref]$ParsedInstallDate = Get-Date 
              If ([DateTime]::TryParseExact($SubKey.GetValue("InstallDate"),"yyyyMMdd",$Null,[System.Globalization.DateTimeStyles]::None,$ParsedInstallDate)) {
                $Entry.InstallDate = $ParsedInstallDate.Value 
              } 
              $Entry.EstimatedSize = [Math]::Round($SubKey.GetValue("EstimatedSize")/1KB,1); 
              $Entry.Version = $SubKey.GetValue("DisplayVersion"); 
              [Void]$Results.Add($Entry); 
            } 
          } 
        } 
      } 
      $Results | Sort-Object Name | Out-GridView -Title "get-InstalledSoftware"
    }
    get-InstalledSoftware HOSTNAME.domain.com
  • Show Printers .ps1

    get-Printers.ps1

    $strComputer = "HOSTNAME"
     
    $colItems = get-wmiobject -class "Win32_PrinterConfiguration" -namespace "root\CIMV2" -computername $strComputer
     
    ForEach ($objItem in $colItems) {
    	write-host "Bits Per Pel: " $objItem.BitsPerPel
    	write-host "Caption: " $objItem.Caption
    	write-host "Collate: " $objItem.Collate
    	write-host "Color: " $objItem.Color
    	write-host "Copies: " $objItem.Copies
    	write-host "Description: " $objItem.Description
    	write-host "Device Name: " $objItem.DeviceName
    	write-host "Display Flags: " $objItem.DisplayFlags
    	write-host "Display Frequency: " $objItem.DisplayFrequency
    	write-host "Dither Type: " $objItem.DitherType
    	write-host "Driver Version: " $objItem.DriverVersion
    	write-host "Duplex: " $objItem.Duplex
    	write-host "Form Name: " $objItem.FormName
    	write-host "Horizontal Resolution: " $objItem.HorizontalResolution
    	write-host "ICM Intent: " $objItem.ICMIntent
    	write-host "ICM Method: " $objItem.ICMMethod
    	write-host "Log Pixels: " $objItem.LogPixels
    	write-host "Media Type: " $objItem.MediaType
    	write-host "Name: " $objItem.Name
    	write-host "Orientation: " $objItem.Orientation
    	write-host "Paper Length: " $objItem.PaperLength
    	write-host "Paper Size: " $objItem.PaperSize
    	write-host "Paper Width: " $objItem.PaperWidth
    	write-host "Pels Height: " $objItem.PelsHeight
    	write-host "Pels Width: " $objItem.PelsWidth
    	write-host "Print Quality: " $objItem.PrintQuality
    	write-host "Scale: " $objItem.Scale
    	write-host "Setting ID: " $objItem.SettingID
    	write-host "Specification Version: " $objItem.SpecificationVersion
    	write-host "TT Option: " $objItem.TTOption
    	write-host "Vertical Resolution: " $objItem.VerticalResolution
    	write-host "X Resolution: " $objItem.XResolution
    	write-host "Y Resolution: " $objItem.YResolution
    	write-host
    }
  • Show Remote Host Time .vbs

    get-RemoteHostTime.vbs

    strComputer = "HOSTNAME.domain.com"
     
    Set objWMIService = GetObject("winmgmts:\\" & strComputer & "\root\cimv2")
     
    Set colItems = objWMIService.ExecQuery("Select * From Win32_OperatingSystem")
     
    For Each objItem In colItems
      strTime = objItem.LocalDateTime
      dtmTime = CDate(Mid (strTime, 9, 2) & ":" & Mid(strTime, 11, 2) & ":" & Mid(strTime, 13, 2))
      dtmTime = CDate(dtmTime)
      WScript.Echo FormatDateTime(dtmTime, vbFormatLongTime)
    Next
  • Show Scheduled Tasks .ps1

    get-ScheduledTasks.ps1

    $strComputer = "HOSTNAME"
     
    $colItems = get-wmiobject -class "Win32_ScheduledJob" -namespace "root\CIMV2" -computername $strComputer
     
    foreach ($objItem in $colItems) {
    	write-host "Caption: " $objItem.Caption
    	write-host "Command: " $objItem.Command
    	write-host "Days Of Month: " $objItem.DaysOfMonth
    	write-host "Days Of Week: " $objItem.DaysOfWeek
    	write-host "Description: " $objItem.Description
    	write-host "Elapsed Time: " $objItem.ElapsedTime
    	write-host "Installation Date: " $objItem.InstallDate
    	write-host "Interact With Desktop: " $objItem.InteractWithDesktop
    	write-host "Job ID: " $objItem.JobId
    	write-host "Job Status: " $objItem.JobStatus
    	write-host "Name: " $objItem.Name
    	write-host "Notify: " $objItem.Notify
    	write-host "Owner: " $objItem.Owner
    	write-host "Priority: " $objItem.Priority
    	write-host "Run Repeatedly: " $objItem.RunRepeatedly
    	write-host "Start Time: " $objItem.StartTime
    	write-host "Status: " $objItem.Status
    	write-host "Time Submitted: " $objItem.TimeSubmitted
    	write-host "Until Time: " $objItem.UntilTime
    	write-host
    }
  • Show Server Uptime .ps1

    get-ServerUptime.ps1

    Param (
      [string]$outputfilepath = "C:\TEMP\RedGreenUpTime.html", 
      [array]$servers = @("HOST1","HOST2","ETC") 
    ) 
     
    Function Get-UpTime {
    	Param ([string[]]$servers) 
    	Foreach ($s in $servers) {  
      	If (Test-Connection -cn $s -Quiet -BufferSize 16 -Count 1) { 
        	$os = Get-WmiObject -class win32_OperatingSystem -cn $s  
          New-Object psobject -Property @{computer=$s; 
          uptime = (get-date) - $os.converttodatetime($os.lastbootuptime)}
    		}
        Else {
    			New-Object psobject -Property @{computer=$s; uptime = "DOWN"}
    		}
      }
    }
     
    $style = @
      
     BODY{background-color:AntiqueWhite;} 
     TABLE{border-width: 1px;border-style: solid;border-color: Black;border-collapse: collapse;} 
     TH{border-width: 1px;padding: 0px;border-style: solid;border-color: black;background-color:DarkSalmon} 
    "@ 
     
    $precontent = @
     <h1>Server Uptime Report</h1> 
     <h2>The following report was run on $(get-date)</h2> 
    "@ 
     
    $i = 0 
     
    ForEach($server in $servers) {
    	$uptime = Get-UpTime -servers $server  
      $rtn = New-Variable -Name "$server$i" -PassThru 
      If ($uptime.uptime -eq "DOWN") {
    		$uptime.uptime -eq "DOWN" 
        $upstyleRed = $style + "`r`nTD{border-width: 1px;padding: 0px;border-style: solid;border-color: black;background-color:Red} " 
        $rtn.value = $uptime | ConvertTo-Html -As Table -Fragment  -PreContent $upstyleRed | Out-String 
      }  
      Else {
    		$uptime.uptime -eq "DOWN" 
        $upstyleGreen = $style + "`r`nTD{border-width: 1px;padding: 0px;border-style: solid;border-color: black;background-color:Green} </style>" 
        $rtn.value = $uptime | ConvertTo-Html -As Table -Fragment  -PreContent $upstyleGreen | Out-String 
      }  
     
    	[array]$frags+=$rtn.Name 
    	$i++ 
    } 
     
    $fragments = foreach($f in $frags) { Get-Variable $f | select -ExpandProperty value } 
    ConvertTo-Html -PreContent $precontent -PostContent $fragments >> $outputfilepath  
    #Invoke-Item $outputfilepath
  • Silent Driver Install for MSI - "Would you like to install this device software?"

    Problem: Driver will not install silently.

    When trying to complete a silent install of a vendor supplied MSI that comes bundled with drivers, a window is shown during install prompting for input to continue with the install. The window shown also gives you the option to trust that publisher for future installs.
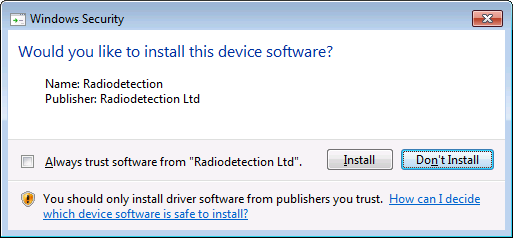
     

    Reason: The certificate has gone past it's expiration date.

    The reason why the Windows Security prompt is displayed is because the certifcate that was used to sign the .cat catalog file has gone past it's expiration date.

    Fix: Add the certificate as a Trusted Publisher.

    Adding the certificate into the certificate store within the Trusted Publisher folder will then allow any drivers from that publisher/vendor to install without any security prompts. Ticking the box on the "Would you like to install this device software" window has the same outcome.

    Instructions:

    Firstly we need to run through an install of the application so we can obtain a copy of the certifcate to use as a trusted publisher section of the certificate store. I completed this task in a VM on my test environment.

    1. In your test environment complete an install of the application making sure to tick the 'Always trust software from......' box and choose 'Install' on the Windows Security prompt.

    2. Run certmgr.msc or open the certifcate manager however you like, navigate and expand the trusted publisher section on the left then click certificates underneath it.

    3. You should see the certificate with the same name as from the Windows Security prompt (if you don't and you had the certificate store open while doing the install you just need to refresh the store, otherwise you will need to troubleshoot as to why).

    4. Right click the certificate and choose 'All Tasks - Export' leaving everything as default save to a known location with a relevant filename, I'll use mycert.cer as the example for this.

    Now that we have a copy of the certificate we just need to get the MSI to install the certificate in the trusted publisher section prior to the driver being installed. If like myself you are doing this with a vendor supplied MSI you will need to create a .mst transform file to make the changes to the MSI, I'm using Installshield but the process can be tailored for whatever tool you're using.

    5. Add the certifcate you exported above to your transform (choosing either to compress the extra file into a cab or leave uncompressed, I added mine to a component that installs to the INSTALLDIR.

    6. For the install the position of the 'Install Exec Sequence' may be different to my example, it depends on what method the vendor MSI ha used to install the drivers. If the 'MsiProcessDrivers' action is present in the sequence you will probably have to move it so that it occurs after we add the certificate.

    7. We'll need to create a custom action for install and another to un-install as per the tables below - both need be 'New EXE - Path referencing a directory'.

    NAME - InstallCert  
    *Action*  
    Working Directory INSTALLDIR
    File Name & Command Line certutil -addstore "TrustedPublisher" "[INSTALLDIR]mycert.cer"
    Return Processing
    Synchronous (Ignores exit code)
    In-Script Execution Deferred Execution in System Context
    *Sequence*  
    Install Exec Sequence
    After InstallFiles
    Install Exec Condition
    NOT Installed


    NAME - UnInstallCert  
    *Action*  
    Working Directory INSTALLDIR
    File Name & Command Line certutil -delstore "TrustedPublisher" "[INSTALLDIR]mycert.cer"
    Return Processing
    Synchronous (Ignores exit code)
    In-Script Execution Deferred Execution in System Context
    *Sequence*  
    Install Exec Sequence
    After SelfUnregModules
    Install Exec Condition
    REMOVE="ALL"


    8. Save and compile the MSI.


    You can easily test whether your custom actions are working by completing an install and checking the trusted publishers section in the certificate manager..........or just complete an install and see if you're prompted by the Windows Security dialog.

  • Start Shcut Withargs .vbs

    1
    2
    3
    4
    5
    6
    7
    8
    9
    10
    11
    12
    13
    14
    15
    16
    17
    18
    19
    20
    21
    22
    23
    24
    25
    26
    27
    28
    29
    30
    31
    32
    '*  Script name:   	start_shcut_withargs.vbs
    '*  Created on:    	21/07/16
    '*  Author:        	BlueSkies
    '*  Purpose:       	Launches shortcuts taking the shortcut path and name from arguments
    '*  Usage:		wscript start_shcut_withargs.vbs "FolderName1" "FolderName2" "ShortcutName"
    '*  Version:		0.1
    '==================================================================
     
    Option Explicit
    Dim WshShell, strAllUsersFld, strLnkpath, strAppFld1, strAppFld2, strShrtLnk
    Set WshShell = WScript.CreateObject("WScript.Shell")
     
    strAllUsersFld = WshShell.SpecialFolders("AllUsersStartMenu")
     
    if WScript.Arguments.Count = 3 Then
    	strAppFld1 = Wscript.Arguments(0)
    	strAppFld2 = Wscript.Arguments(1)
    	strShrtLnk = Wscript.Arguments(2)
    	strLnkpath = Chr(34) & strAllUsersFld & "\Programs\" & strAppFld1 & "\" & strAppFld2 & "\" & strShrtLnk & ".lnk" & Chr(34)
    ElseIf WScript.Arguments.Count = 2 Then
    	strAppFld1 = Wscript.Arguments(0)
    	strShrtLnk = Wscript.Arguments(1)
    	strLnkpath = Chr(34) & strAllUsersFld & "\Programs\" & strAppFld1 &  "\" & strShrtLnk & ".lnk" & Chr(34)
    Else
    	strShrtLnk = Wscript.Arguments(0)
      	strLnkpath = Chr(34) & strAllUsersFld & "\Programs\" & strShrtLnk & ".lnk" & Chr(34)
    End If
     
    'WScript.Echo strLnkpath
    WshShell.Run strLnkpath, 1, True
     
    set WshShell = nothing
  • Variable VBScript Shortcut Launcher

    Problem: Trying to launch an application through XenApp 6.5 with a long command line launch path fails with an error “Your request to connect to this Citrix server has been rejected due to insufficient buffers. Please call your system administrator. Click OK to terminate.”

    XenApp buffer error


    Reason: XenApp follows Window’s 256 character limit and worse still since the Citrix executable has to be included in that 256 limit the actual path limit for XenApp is 188 characters, any launch path with more than 188 characters in Citrix will fail with the message above.

    Fix:There are multiple ways to work around the issue and one way to fix it, to fix the issue (at least if your using Windows) use the ‘LongCommandLine’ setting which can be set in the ICA connection file (more details here). Since I can’t fix the issue the method I’ll use to work around it is to have a VBScript launch the already existing application shortcut.

    So you don’t have to write a different script for every application that uses launch paths longer than allowed you can use a script that accepts arguments for the path and name of the shortcut.

    i.e.

    wscript "C:\Path\to\script\start_sh.vbs" "FOLDER1" “FOLDER2” "SHORTCUT"
    wscript "C:\Path\to\script\start_sh.vbs" "Accessories" "Paint"

    XenApp location string
     

    The example above would launch MSpaint, the example below is a similar example using duff data but gives a better idea of how the script can be used in a real world scenario for an App-V application. The script itself is stored within the App-V package but it could be stored anywhere locally on each Citrix server – obviously distributing the script still has to be taken care of in that scenario.

    wscript "C:\ProgramData\Microsoft\AppV\Client\Integration\66AD086E-D220-43A4-8407-E00BAA2F4AC3\Root\start_sh.vbs" "AppFolder" "ShortcutName"

    You can find the script at the following location Start Shcut Withargs .vbs