Packaging

  • Delete Folder on Uninstall of MSI

    Problem: Application remnants remain after uninstall.

    After uninstalling a particular MSI some remnants remain of the application files in the ProgramFiles folder.

    Reason: Application is updated in situe.

    The application is a standard client/server setup with application updates being applied to the server which then disseminate to all clients which means files are present on the client that weren't put there by the MSI itself. Natively an MSI will only remove files that were installed by itself...............or if they've been added to the removefiles table, however we have no idea of the name of the files that will need to be removed so we need a catch all solution.

    Fix: Script the removal of the folder during uninstall.

    I decided on a vbscript in a custom action to the remove the folder and all it's contents, triggered when the application is uninstalled.


    Create a VBScript Custom Action that is stored within the CA and complete as per below, you can find the VBScript here.

    *Action*  
    Return Processing
    Synchronous (Check exit code)
    In-Script Execution Deferred Execution in System Context
    Key Installer\Products\<GUID>
    Name Transforms
    Component ISRegistryValue
    *Sequence* - Install Exec After RemoveFolders
    Install Exec Condition
    REMOVE="ALL"
  • Lync 2013 Basic Deployment

     These instructions are for Microsoft Lync 2013 Basic which has fewer features than Lync 2013 Full. However the basic concept will work for both versions.

    Step 1 – Extract files from the Lync Basic installer: %sourcelocation%\lyncentry.exe /extract:%extractionlocation%

    Step 2 – From the extracted files run the OCT tool: %extractionlocation%\setup.exe /admin

    Step 3 – Use OCT to configure a msp file to your desired customization choices.

    Step 4 – To avoid the “First things first” window when user start Lync for the first time add the following reg entries under Additional Content | Add Registry Entries in the OCT tool

    Step 5 – Save your settings to your MSP file.

    Step 6 – Deploy your MSP. How you deploy is up to you:

    • You can add the MSP file you create to the Updates folder of the extracted files from the source installer and run the install with the command %extractionlocation%\setup.exe. This will install all the msp in the Updates folder including your custom MSP. You will see a Microsoft setup window for a second as it reads the MSP file before installing.
    • You can save the MSP to whatever place you like and use a command that will point to that place; %extractionlocation%\setup.exe /adminfile %yourcustomMSPlocation%
  • Silent Driver Install for MSI - "Would you like to install this device software?"

    Problem: Driver will not install silently.

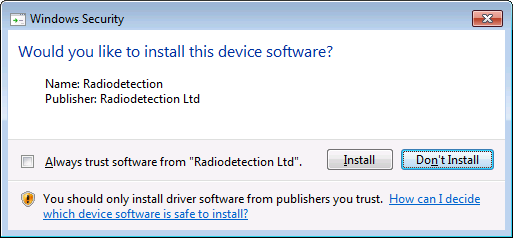
    When trying to complete a silent install of a vendor supplied MSI that comes bundled with drivers, a window is shown during install prompting for input to continue with the install. The window shown also gives you the option to trust that publisher for future installs.


    Reason: The certificate has gone past it's expiration date.

    The reason why the Windows Security prompt is displayed is because the certifcate that was used to sign the .cat catalog file has gone past it's expiration date.

    Fix: Add the certificate as a Trusted Publisher.

    Adding the certificate into the certificate store within the Trusted Publisher folder will then allow any drivers from that publisher/vendor to install without any security prompts. Ticking the box on the "Would you like to install this device software" window has the same outcome.

    Instructions:

    Firstly we need to run through an install of the application so we can obtain a copy of the certifcate to use as a trusted publisher section of the certificate store. I completed this task in a VM on my test environment.

    1. In your test environment complete an install of the application making sure to tick the 'Always trust software from......' box and choose 'Install' on the Windows Security prompt.

    2. Run certmgr.msc or open the certifcate manager however you like, navigate and expand the trusted publisher section on the left then click certificates underneath it.

    3. You should see the certificate with the same name as from the Windows Security prompt (if you don't and you had the certificate store open while doing the install you just need to refresh the store, otherwise you will need to troubleshoot as to why).

    4. Right click the certificate and choose 'All Tasks - Export' leaving everything as default save to a known location with a relevant filename, I'll use mycert.cer as the example for this.

    Now that we have a copy of the certificate we just need to get the MSI to install the certificate in the trusted publisher section prior to the driver being installed. If like myself you are doing this with a vendor supplied MSI you will need to create a .mst transform file to make the changes to the MSI, I'm using Installshield but the process can be tailored for whatever tool you're using.

    5. Add the certifcate you exported above to your transform (choosing either to compress the extra file into a cab or leave uncompressed, I added mine to a component that installs to the INSTALLDIR.

    6. For the install the position of the 'Install Exec Sequence' may be different to my example, it depends on what method the vendor MSI ha used to install the drivers. If the 'MsiProcessDrivers' action is present in the sequence you will probably have to move it so that it occurs after we add the certificate.

    7. We'll need to create a custom action for install and another to un-install as per the tables below - both need be 'New EXE - Path referencing a directory'.

    NAME - InstallCert  
    *Action*  
    Working Directory INSTALLDIR
    File Name & Command Line certutil -addstore "TrustedPublisher" "[INSTALLDIR]mycert.cer"
    Return Processing
    Synchronous (Ignores exit code)
    In-Script Execution Deferred Execution in System Context
    *Sequence*  
    Install Exec Sequence
    After InstallFiles
    Install Exec Condition
    NOT Installed


    NAME - UnInstallCert  
    *Action*  
    Working Directory INSTALLDIR
    File Name & Command Line certutil -delstore "TrustedPublisher" "[INSTALLDIR]mycert.cer"
    Return Processing
    Synchronous (Ignores exit code)
    In-Script Execution Deferred Execution in System Context
    *Sequence*  
    Install Exec Sequence
    After SelfUnregModules
    Install Exec Condition
    REMOVE="ALL"


    8. Save and compile the MSI.


    You can easily test whether your custom actions are working by completing an install and checking the trusted publishers section in the certificate manager..........or just complete an install and see if you're prompted by the Windows Security dialog.

  • Variable VBScript Shortcut Launcher

    Problem: Trying to launch an application through XenApp 6.5 with a long command line launch path fails with an error “Your request to connect to this Citrix server has been rejected due to insufficient buffers. Please call your system administrator. Click OK to terminate.”

    XenApp buffer error


    Reason: XenApp follows Window’s 256 character limit and worse still since the Citrix executable has to be included in that 256 limit the actual path limit for XenApp is 188 characters, any launch path with more than 188 characters in Citrix will fail with the message above.

    Fix:There are multiple ways to work around the issue and one way to fix it, to fix the issue (at least if your using Windows) use the ‘LongCommandLine’ setting which can be set in the ICA connection file (more details here). Since I can’t fix the issue the method I’ll use to work around it is to have a VBScript launch the already existing application shortcut.

    So you don’t have to write a different script for every application that uses launch paths longer than allowed you can use a script that accepts arguments for the path and name of the shortcut.

    i.e.

    wscript "C:\Path\to\script\start_sh.vbs" "FOLDER1" “FOLDER2” "SHORTCUT"
    wscript "C:\Path\to\script\start_sh.vbs" "Accessories" "Paint"

    XenApp location string
     

    The example above would launch MSpaint, the example below is a similar example using duff data but gives a better idea of how the script can be used in a real world scenario for an App-V application. The script itself is stored within the App-V package but it could be stored anywhere locally on each Citrix server – obviously distributing the script still has to be taken care of in that scenario.

    wscript "C:\ProgramData\Microsoft\AppV\Client\Integration\66AD086E-D220-43A4-8407-E00BAA2F4AC3\Root\start_sh.vbs" "AppFolder" "ShortcutName"

    You can find the script at the following location Start Shcut Withargs .vbs

  • Visual C++ 2012 for Enterprise Deployment

    Recently I had to package several versions of Visual C++ for a client including the 2012 version. Previous versions of Visual C++ have proven to be pretty straight forward, but 2012 is a little different:

    1. Download the installer from Microsoft here.

    2. Install the executable on a PC/VM.

    3. Navigate to C:\Program Data\Package Cache\.

    – There might be several sub folders in this location. Go through them until you find one that has a vcRuntimeMinimum_x86 folder, there will be a separate one with a vcRuntimeAdditional_x86.

    – Obviously if you are installing the 64-bit version the folder names with say x64 instead of x86

    4. Copy the MSI’s and CAB files in each folder and move them to a folder to stage your package.

    5. Create an MST with whatever standards you want and add the public property of ADDEPLOY=1 so that you don’t get this message:

    “To install this product, please run Setup.exe. For other installation options, see the Installation section of ReadMe.htm”

    6. Install vc_runtimeMinimum_x86.msi first, then install vcRuntimeAdditional_x86.msi second. Include your transforms :

    – Example  – “msiexec.exe /i vc_runtimeMinimum.msi TRANSFORMS=MST.mst /qn”

    *alternative* – You could also create a chained MSI package for the two so that you don’t have to run two separate installs. Please read here on how to created a non-streamed chained MSI package.